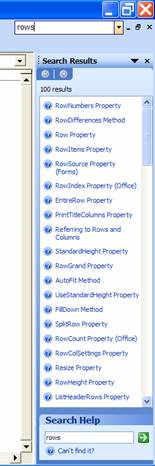
Recent CommentsW.K. on May 17, 2011 I have read some of your web contributions. They are amazing (case study to understand the code) and you have a pretty simple way of putting across difficult logic. Excel User on May 25, 2011 Very well explained. Good job! Case Study – Understanding codeThis case study was inspired by someone who wanted an explanation of the code sample below. Sub Test1() With Range("B2:B" & Cells(Rows.Count, 1).End(xlUp).Row) .SpecialCells(4).Formula = "=R[-1]C" .Value = .Value End With End Sub If you really want to learn how object oriented models seem to do so much with so little code, break everything up into the individual atomic components. Then, put it all back together. In between, make extensive use of XL VBA help, msdn.microsoft.com, and whatever books are at your disposal. But before we get started, I should point out one thing. Microsoft Office 2003 does an absolutely awful job of searching its help files (MSDN does a much better job). Search results that should naturally be at the top will be nowhere near there; sometimes they will be near the end of the list, which means having to scroll down a few pages. But, it is worth the effort since, typically, the content of the help file is very good. Let's start with the first line: Range("B2:B" & Cells(Rows.Count, 1).End(xlUp).Row) Just like an XL formula, we have to read this left-to-right and from the inside out. When something has parenthesis, we need to resolve what's inside the parenthesis first and then move out. Otherwise, we go left to right. OK, so, the parenthesis pair for the Range represents the first and last parenthesis in the line. So, we first look at what's inside, or at "B2:B" & Cells(Rows.Count, 1).End(xlUp).Row The first part looks familiar. It's the start of a range identifier B2:B…but, don't we need a number at the end? Clearly, that should come from the &… stuff. So, let's look at Cells(Rows.Count, 1).End(xlUp).Row. Oh, oh. Another set of parenthesis. Stepping in, we need to look at Rows.Count. No parentheses; hence, go left-to-right. If we look up XL VBA help for the key word 'rows' (without the single quotes) we will find the Rows property. This is one of those instances where the keyword searched is not only nowhere near the top, it is not even on the first page of results displayed. Scroll down one page and the Rows Property is towards the top of the second page (see Figure 1).
|
||||||
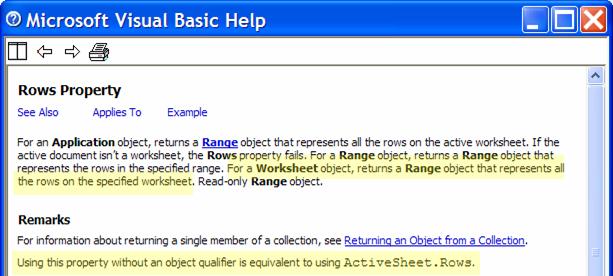
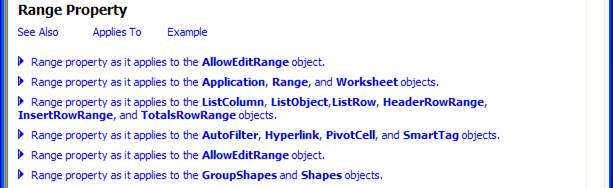
Figure 1 Click on the Rows Property link to access the help page. It reads:
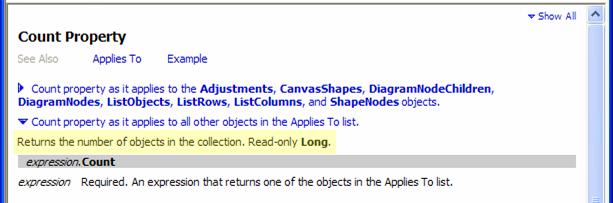
How do we know if our reference is to the application object, the worksheet, or something else? Look at the highlighted sentence in the Remarks section: "Using this property without an object qualifier is equivalent to using ActiveSheet.Rows." Putting the two highlighted sentences together, we realize that Rows, by itself, returns a range object the represents all the rows on the active worksheet. The use of unqualified properties or methods such as Rows above as well as Cells and Range can – and often do – have unintended consequences. It is significantly safer to always qualified references. See chapter xx – case study yy for more. OK, armed with the knowledge that we have a range object that represents all the rows in the active worksheet, what does the .Count part do? If it is not obvious, look it up in XL help.
OK, so, Rows.Count returns a count of the number of rows in the worksheet – 65,536. Why not just use that number? Because a future version of Excel might have a different number of rows!
In any case, moving on…
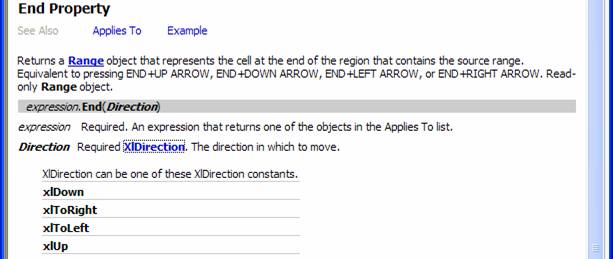
There are three things that we should note. First, in the Remarks section we find "Using this property without an object qualifier returns a Range object that represents all the cells on the active worksheet." Second, clicking on the “Cells Property as it applies to the Worksheet object.” indicates that the use of the unqualified Cells gives us a collection of all the cells in the worksheet. The third and final item to note is the paragraph above the Remarks section: "Because the Item property is the default property for the Range object, you can specify the row and column index immediately after the Cells keyword." What does that mean? Basically that we can use the shortcut Cells(row, column) rather than Cells.Item(row, column) to identify one specific cell. So, now we know what Cells (Rows.Count, 1) means – the last cell in column 1, i.e., column A. In the current version of XL that would be A65536, but it could be something else in a future version. OK, we are now ready to tackle Cells(Rows.Count,1).End(xlUp) Guess what we have to do? You got it. Enter the keyword end in XL VBA help search and it will lead us to the End property – and for a change it is at the top of the list!
The first paragraph tells us exactly what End returns. It returns a Range object that is the equivalent to the result of a particular keystroke combination. Clicking on xlDirection shows the list of valid values for Direction. Hopefully, it is evident to the reader that xlUp corresponds to the 2 key combination: END+UP ARROW. To find out what this does, enter some numbers in A1:A5, then go to A65536, and press the 2 keys: END+UP ARROW. You will find it takes you to the bottom-most non-empty cell in column A – which makes sense, I suppose. Here’s an important caveat. What happens if cells A65535 and A65536 are not empty? Where does END+UP ARROW leave us? Is it really the bottom-most non-empty cell in column A? Similarly, what if the column is completely empty? Does END+UP ARROW take us to the bottom-most non-empty cell in column A? These are limitations of End() that the developer should be aware of. When used properly and with the proper precautions, End() is a very useful property. So, now we know what Cells(Rows.Count,1).End(xlUp) does. It gives us a range object that represents the bottommost non-empty cell in column A. Next, we have Cells(Rows.Count,1).End(xlUp).Row. We can guess what .Row does but it doesn't hurt to look it up in VBA help.
It gives us a number that represents the row of the first cell in the range object to which the property is applied. In our case, the range consists of a single cell (bottom-most non-empty cell in col. A). So, now we have the row number of the bottommost non-empty cell in column A. OK, we have worked inside out and left to right to get to the point of Range("B2:B" & {row number of
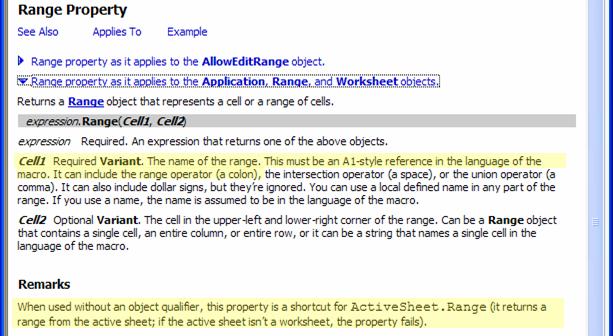
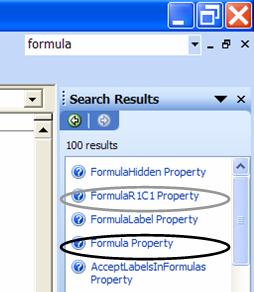
bottom-most non-empty cell in column A}) If we search VBA help for ‘range’ (by now, you do know what to do with the quotes, don’t you?), we find the ‘range property’ near the bottom of the last-but-one page. Click on the link and the VBA help page shows:
It would be fair to conclude that we are interested in the 2nd item. Click that to see:
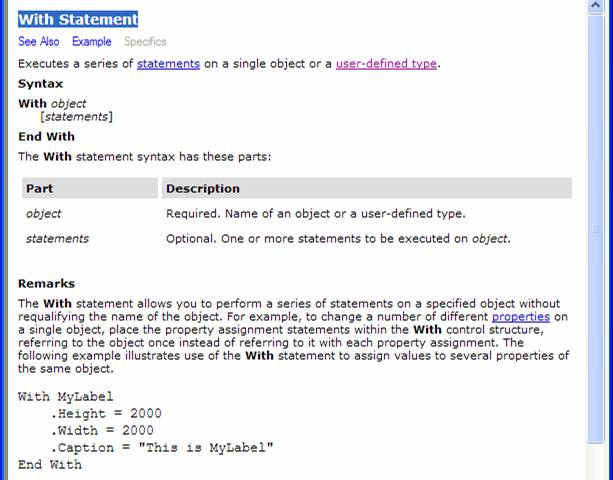
It tells you right up front: Returns a Range object that represents a cell or a range of cells. OK, so, one way or anther we will get a range object. What else? expression.Range(Cell1, Cell2) where Cell1 is required and Cell2 is optional As in the case of the Rows and the Cells properties, in the Remarks section we find: "When used without an object qualifier, this property is a shortcut for ActiveSheet.Range (it returns a range from the active sheet; if the active sheet isn’t a worksheet, the property fails)." So, the unqualified use of Range property means that it applies to the active sheet. Also, we are not using the optional Cell2 part. Further, we are using the variant with the "range operator (a colon)." Well, we almost know what the first line in the code means: Range (B2:B{number of row of bottom-most non-empty cell in column A}) : all the cells in column B from row 2 to the last row that contains data in column A. Could this be done differently? Yes. I prefer working with objects rather than bouncing back and forth between objects and their attributes as done above. Why convert the range object identified by Cells (Rows.Count, 1).End(xlUp) to a row number, concatenate it with the string B2:B and then convert that to a range object with the Range() property? We could have stayed with objects all the way and used the Range (Cell1, Cell2) variation as in: With Range(Cells(2, 2), Cells(Rows.Count, 1).End(xlUp).Offset(0, 1)) OK, back to the task at hand. Search With in help and we find…oops, nothing. Search for with statement and we will find what we are looking for.
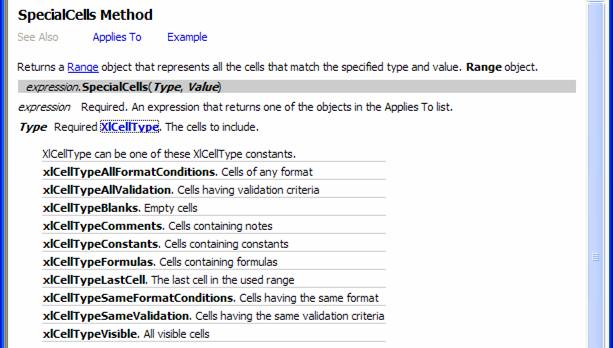
Basically, it is a way to avoid repeating a reference to the object that is next to the With keyword. So, .SpecialCells().Formula=... .Value=.Value are the equivalent of Range("B2...).SpecialCells().Formula=... Range("B2...).Value=Range("B2...).Value The With saves us that much typing – and, in certain cases, may even speed up code execution. Continuing in the above vein, let's wrap up the analysis of the rest of the code. Searching VBA help for SpecialCells leads to the SpecialCells method:
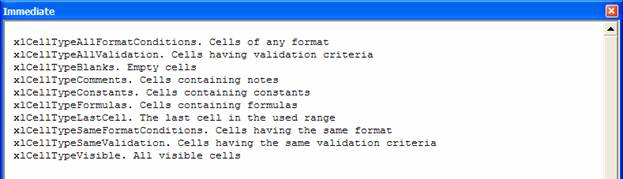
It would appear that we are stuck. The code reads SpecialCells(4). The author perversely used a constant rather than the mnemonic from the list above. Can we figure out how the constant value 4 maps onto one of the xlCellType… items? Yes, but it isn't pretty – and certainly not as trivial as using the mnemonic in the first place. Nonetheless, it can be done. Select the entire text corresponding to the description of valid values for xlCellType. In the VBE, open the immediate window (CTRL+G) and paste.
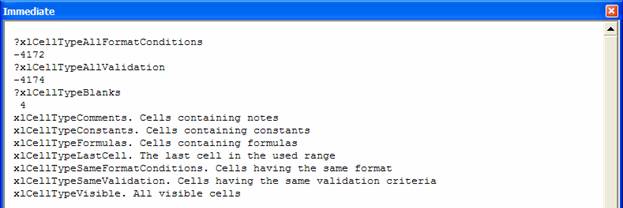
Now, for each line, put in a ? at the front and delete the explanation after the keyword. Press ENTER and VBE will give you the constant value. Stop when you see a 4.
Bingo! So, now we know what the author really meant – or we hope that is what was meant!
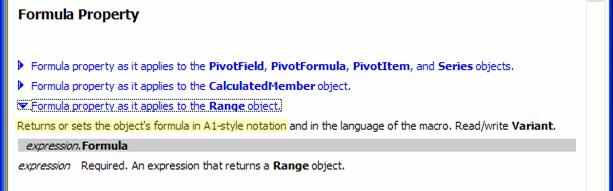
The Formula property itself reads:
So, it appears that the author bent some rules here. The Formula property is meant to be used with A1 style formulas, not the R1C1 variety. While in this case Excel and/or VBA accommodated this deviation from the documentation, in other instances the formula style requirements are enforced. I would have used .FormulaR1C1=... The final piece: .Value=.Value. This is a 'trick' in the sense that assignments to the Formula, FormulaR1C1, Value, Value2, and a few other properties are mutually exclusive. Assigning to one thrashes what had earlier been entered in any of the others. So, .Value=.Value takes the current value in the cell and puts it back. But that effectively removes the formula from the cell! Conclusion: Effectively, the author entered in each empty cell in the identified range in column B the value of the cell above it. And, if the cell above it was empty, that cell would have got the value from the cell above it all the way until Excel found a non-empty cell.
|