In the vast majority of cases, a userform contains a static list of items: these captions, those textboxes, such-and-such commandbuttons, etc. Then, there are those instances when the contents of the userform cannot be determined except at runtime. The design of the userform specifies where and how the controls will be shown with the actual controls added at runtime. I recently had to create such a dynamic userform while working on TM Retro Slicers – an add-in that extends the Excel 2010 slicer capability to earlier versions of Excel. This note shows how to work with such a dynamic userform.
For those not familiar with a slicer, it is a filter for a pivottable (or pivotchart) field shown as an independent object. A slicer has are other capabilities but they are not germane to this note.
In TM Retro Slicers, I use a userform to show a slicer. A slicer separately lists every value associated with a particular pivot field. So, if a particular pivot field, Location, has 2 values (Campus and Satellite), the associated slicer would look like:
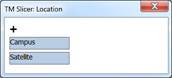
Figure 1 – the + is a static label control.
The blue controls below it are added at runtime
The + sign in the userform is a static control. The blue controls below it are added at runtime.
On the other hand, if there are many more items in the pivotfield (as in the example below), the same userform would list each of those values separately. Obviously, this requires a taller userform.
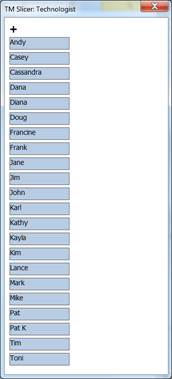
Figure 2
Comparing a statically created form and one that is created dynamically leads to a few key differences:
· We have to add the controls and configure the relevant attributes of each of these controls at runtime rather than at design time. Similarly, we have to configure the userform’s attributes (in particular, its size) at runtime.
· When we add a control dynamically, there has to be a way to retain a reference to the control so that we can subsequently work with it. Typically, this is done by adding it to a global VBA collection (or a Scripting.Dictionary) object.
· We have to have some way to respond to user actions (such as a mouse click) associated with these dynamically added controls.
The Userform.Controls collection supports the Add method and it is this method that we will use to add controls to the form. The syntax to add a control to a userform is
Set Control = object.Add( ProgID [, Name [,
Visible]])
The help page for the Add Method lists the following valid ProfIDs:
|
CheckBox |
Forms.CheckBox.1 |
|
ComboBox |
Forms.ComboBox.1 |
|
CommandButton |
Forms.CommandButton.1 |
|
Frame |
Forms.Frame.1 |
|
Image |
Forms.Image.1 |
|
Label |
Forms.Label.1 |
|
ListBox |
Forms.ListBox.1 |
|
MultiPage |
Forms.MultiPage.1 |
|
OptionButton |
Forms.OptionButton.1 |
|
ScrollBar |
Forms.ScrollBar.1 |
|
SpinButton |
Forms.SpinButton.1 |
|
TabStrip |
Forms.TabStrip.1 |
|
TextBox |
Forms.TextBox.1 |
|
ToggleButton |
Forms.ToggleButton.1 |
And, here’s a bonus. How does one add a RefEdit control? Stumped? Well, I didn’t know either but a Google search of the ‘Net led to
|
RefEdit |
RefEdit.Ctrl |
To start with the example, create a userform and add a label towards the left top of the userform. Change to caption to the plus sign (+) and name this control lbl_AddPT. Next, and as I almost always do, add a public method (called Manager) that a consumer of the userform will use to create the slicer’s userform. The code in Manager initializes the collection where we will store a reference to each newly created label. It also creates one label control for each pivot item in the pivot field passed as the argument to the Manager method. Then, it adjusts the height of the userform to accommodate all the labels. It also changes the userform’s caption to include the pivotfield’s name and then shows the userform.
Option Explicit
Dim AllLbls As Collection
Public Function Manager(ByVal SlicerField As PivotField) _
As Boolean
Set AllLbls = New Collection
Dim aPI As PivotItem, BtnNbr As Integer
On Error GoTo ErrXIT
For Each aPI In SlicerField.PivotItems
addALabel aPI.Value, aPI.Visible, BtnNbr
Next aPI
On Error GoTo 0
With Me.Controls("Val" & (BtnNbr - 1))
Me.Height = .Top + .Height + 30
End With
Me.Caption = "TM Slicer: " & SlicerField.Name
Me.Show vbModeless
Me.Repaint
Manager = True
Exit Function
ErrXIT:
MsgBox "Error: " & Err.Description & " (" & Err.Number & ")"
Manager = False
End Function
Code Sample 1
The work of actually adding each label control is delegated to the addALabel subroutine, which uses the one static control (named lblAddPT) in the userform (see Figure 1) as a base to locate the new controls. It then configures various attributes of the new label. In particular, the background color is set to pale blue if the value is already selected in the pivot field or white if it is not. After configuring all the attributes, the code adds the control to an object of type clsUFLabel and then adds that object to the AddLabels collection. The reason for adding the label to the clsUFLabel object is to enable event handling. We will see how that works in the next section.
Private Sub addALabel(ByVal PIValue As String, PIVisible As Boolean, _
ByRef BtnNbr As Integer)
Dim aLbl As MSForms.Label
Set aLbl = Me.Controls.Add("forms.label.1", "Val" & BtnNbr)
Dim BaseCtl As MSForms.Label: Set BaseCtl = Me.lblAddPT
With aLbl
.Top = BaseCtl.Top + BaseCtl.Height + BtnNbr * (15 + 3) + 3
.Left = 6
.Caption = PIValue ' CellVal
.BackStyle = fmBackStyleOpaque
.BackColor = IIf(PIVisible, lblSelectedColor, lblNonSelectedColor)
.Height = 15
.BorderStyle = fmBorderStyleSingle
Dim X As clsUFLabel: Set X = New clsUFLabel
Set X.aLbl = aLbl
AllLbls.Add X, aLbl.Name
End With
BtnNbr = BtnNbr + 1
End Sub
Code Sample 2
The functions lblSelectedColr and lblNonSelectedColor return RGB values. Rather than add the RGB values to each line of code where they are needed, the functions yield a central location for the colors – something that drastically simplifies maintenance. Put the below code in a standard module.
Public Function lblSelectedColor() As Long
lblSelectedColor = RGB(184, 204, 228)
End Function
Public Function lblNonSelectedColor() As Long
lblNonSelectedColor = RGB(255, 255, 255)
End Function
Code Sample 3
If we were to use the code up to this point – possible by commenting out the references to clsUFLabel – the result would be a userform containing one label per pivot item. But, clicking on the label would do nothing. For that we have to add an event procedure that interacts with the user.
When a userform control is known at design time, one can write an event procedure such as the one below that responds to a user click.
Private Sub lblAddPT_Click()
Debug.Print "In lblAddPT_Click"
End Sub
Code Sample 4
But, what happens when we know what controls to add only at runtime? Clearly, we cannot write the code ahead of time. And, even if we could, there is the question of repetitive code. After all, each of the labels in the slicer will behave identically other than for the fact that they affect a different pivot item. So, writing static code, even if it were possible, would be wasteful. Luckily, there is a simpler way – I first saw it, I believe, on John Walkenbach’s site (www.j-walk.com).
It is possible to declare a variable that supports events with the keyword WithEvents. However, such a variable can exist only in a class module. So, add a new class module, name it clsUFLabel and add the code below. Whenever, the aLbl variable’s Click event occurs, VBA will call the aLbl_Click procedure, which in turn toggles the background color of the label.
Option Explicit
Public WithEvents aLbl As MSForms.Label
Private Sub aLbl_Click()
If aLbl.BackColor = lblSelectedColor Then
aLbl.BackColor = lblNonSelectedColor
Else
aLbl.BackColor = lblSelectedColor
End If
aLbl.Parent.Repaint: DoEvents
End Sub
Code Sample 5
And, of course, in the previous section, we had already added the code to use an object of this class.
To run the above, add a pivottable in a worksheet. Then, select any cell in the pivottable and run the subroutine below to see a list of all the pivotitems for the associated pivotfield. Click any label in the resulting userform and the color of that label will toggle between white and a shade of blue.
Option Explicit
Sub getGoing()
frmSlicer.Manager ActiveCell.PivotField
End Sub