Once the preliminary steps in linking to an external source are complete, MS Query will show the Add Tables dialog box. Select each of the three tables (these are the three spreadsheets in the testDB.xls workbook) and click the Add button. Once done, close the dialog box by using the Close button.

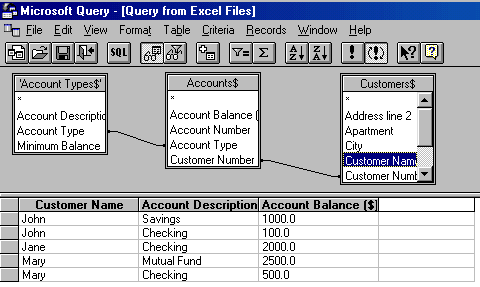
To tell MS Query how the tables are related to each other, click on the common field in the first table and drag the mouse over to the corresponding field in the second table. For example, to link the Account Types and the Accounts tables, click on the Account Type field and drag the mouse over to the Account Type field in the Accounts table. Note that the mouse becomes rectangular when it is positioned within the second table.

Once the mouse is released, MS Query will show the link between the two tables with a connecting line.

Similarly, link the Customers table to the Accounts table. Now, the Customers table and the Account Types table are linked through the Accounts table.

To add a field to the query, double-click on it. For example, to add the Customer Name to the query output double-click on the Customer Name field in the Customers table.

One can also add a field to the query by dragging it from the table to the display area. For example, to add the Account Description, click on it and drag the mouse over to the empty second column. Let go of the mouse when it becomes rectangular.

A third way to add a field to the query output is to select it from a drop-down list. Click on the empty third column and select the Accounts$.Account Balance field.

The final query shows how the tables are linked, the fields that the query will return and their current values.

To return to Excel click the Return Data button. Alternatively, use File | Return Data to Microsoft Excel menu item.

Back in Excel, put the data in an existing worksheet

The result will be:

Query 2 -- A PivotTable from data in the relational database